The Pickup
An acoustic instrument is conceived and built towards the development of the sound in its surrounding area. The electric amplification of acoustic instruments by means of a pick-up requires technologies which maintain the authenticity of the original sound. The McLoud Acoustic Pickup fulfills these requirements to 100%.
The Technology
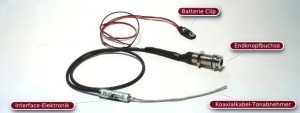
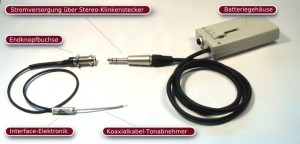
Two principal items are considered mainly responsible for the sound quality of the McLoud. The flexible coaxial cable consists of a special ceramic material, which causes a charge transfer by pressure change of a swinging string within that crystalline structure, from which again a proportional electrical signal is gained. The McLoud is generally evenly sensitive and absorbs thereby a great many more signals from the resonance body of the instrument than a rigid pick-up. The sound wins in naturalness, definition and warmth. The flexibility of the very durable cable makes possible a problem-free installation into almost any instrument. Even round or curved bridges the McLoud masters without a problem. The interface electronics implemented in hybrid technology convert the sensitive signal of the coaxial cable directly into a stable output signal. It is thereby ensured that on the further way up to the socket no feedback is being created. The sound is transferred with virtually no loss.
The Installation
A minimum need for space ensures for the fact that your instrument must accept neither large holes nor any routing. (see for this the detailed fitting instruction), please note, that the installation of McLoud will void your warranty and we recommend to have it installed by a skilled guitar technician or a luthier.
Options
Optional the McLoud ML-1 is also available with a volume control, which can be installed into the side of the guitar by the above mentioned guitar technician or luthier. [/tab] [tab title='McLoud ML1'] The ML1 connects to the amplifier via endpin- jack. This is installed into the guitar by replacing the endpin that sits in the endblock at the bottom of the guitar.The flexible coaxial cable is led by a small hole through the top under the saddle of the bridge. The battery is inserted through the sound hole and is held by a battery-holder placed on the bottom just above the center bottom brace next to the side. With some technical know-how you should be able to do the installation yourself. [/tab] [tab title='McLoud ML3'] The ML3 connects to the amplifier like the ML1 via endpin-jack.This is installed into the guitar by replacing the endpin that sits in the endblock at the bottom of the guitar.The flexible coaxial cable is led by a small hole through the top under the saddle of the bridge. The battery is placed in an external battery-box that is connected through a stereo plug with the endpin-jack. Beside the endpin-jack there is another jack for the cable that connects to the amplifier. With some technical know-how you should be able to do the installation yourself. [/tab] [tab title='Installation'] Please note, that the installation of McLoud will void your warranty and we recommend to have it installed by a skilled guitar technician or a luthier. A good portion of work is the same for both models (ML 1 and ML 3). You need the following tools:
- Power- drill,
- wood drill 13 mm,
- wood drill 2.5 mm,
- flat Wrench (forked) 12 mm,
- Allen key 3 mm in diameter,
- a flat file,
- round file approx. 2 mm.
Now let's do it
- Remove the strings, the saddle and the endpin of your guitar.
- Drill the hole for the endpin-jack at 13mm diameter. Make sure that you drill exactly perpendicular into the endblock of the guitar!
- Drill the hole (2.5 mm) for the pickup-cable at an end of the saddle groove at an angle of 45 degrees to the top, in order to avoid a too sharp bending of the coaxial cable. Break the edges additionally with the round file. Remove all possible wood splinters from the groove and from the lower surface of the top.
- File or sand off approx. 2.3 mm of the lower surface of the saddle, pay attention to the fact that the surface needs to be absolutely straight. It is extremely important that the saddle is held only by the pressure of the strings and not wedged into the groove. The provided wood-strips of spruce or cedar can be placed if necessary as "shock absorbers" between pick-up and saddle. This way the sound gets somewhat warmer.
- Through the 13mm-drilling you measure the thickness of the endblock and adjust the nut of the endpin-jack to this measure.
- Guide the endpin-jack from inside the body of the guitar outside through the drilling. Screw on the 12mm nut from the outside onto the endpin-jack. Do not forget the washer! Tighten the nut with the forked wrench. You can counter the endpin-jack by putting the Allen-key into the crosshole of the thread to keep the endpin-jack from turning.
- By means of the Velcro tape attach the cables to the bottom of the guitar. Guide the pickup by the hole into the saddle groove and fix the saddle with tape across it.
- For the ML 1 thoroughly clean the spot where you want to install the battery holder. We recommend to mount the battery on the bottom just above the center bottom brace next to the side. Attach the two battery-clips to a 9V battery and place the battery holder onto the prepared spot.
- Restring the guitar.
- For the ML 3 restring the guitar.
- Put a 9V battery into the external battery-box, connect to the guitar.
[/tab] [/tab_container]


